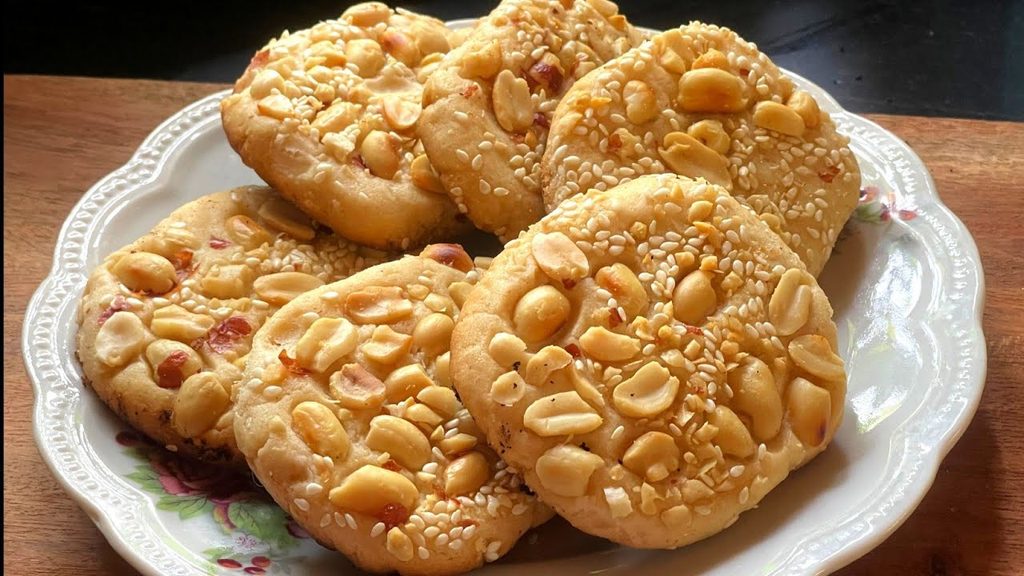
Want to make crispy, bakery-style Badam Biscuits at home in just 15 minutes of cooking time? This easy Badam Biscuit Recipe uses roasted peanuts, sugar, flour, milk powder, and a few simple ingredients to create delicious homemade biscuits that pair perfectly with your morning or evening tea.
The best part is that you don’t need an oven, butter, or ghee. These biscuits can be baked in a preheated kadai on a low flame, making the recipe convenient for home cooks who want to enjoy fresh, homemade tea-time snacks.
The biscuits are coated with crushed roasted peanuts and white sesame seeds for extra flavour and texture. Follow the measurements carefully and allow the biscuits to cool completely before handling them for the best results.
Ingredients for Bakery-Style Badam Biscuits
For the biscuit dough
- ½ cup roasted peanuts, skin removed
- ½ cup sugar
- 1 cup all-purpose flour (maida)
- 1 small 10-rupee packet of milk powder, approximately one packet as described in the recipe
- 1 tablespoon baking powder
- A small pinch of salt
- 4 tablespoons refined oil
For the coating
- A few roasted peanuts, lightly crushed
- 1 tablespoon white sesame seeds
For preparing the tray
- A little refined oil for greasing
- Baking paper or parchment paper, if available
Measurement tip: Use the same cup for measuring the peanuts, sugar, and flour. The quantity of milk powder in the source recipe is described as one small packet; check the packet weight when preparing the recipe.
How to Make Badam Biscuits at Home
Step 1: Grind the roasted peanuts and sugar
Take ½ cup of roasted peanuts with their skins removed. Add them to a mixer grinder along with ½ cup sugar.
Grind until the mixture becomes a fine powder. Continue blending briefly until the natural oils released by the peanuts turn the mixture into a thick paste.
Avoid running the mixer continuously for too long, as the mixture may become excessively oily or warm.
Step 2: Sift the dry ingredients
Transfer the peanut-sugar paste to a mixing bowl.
In another bowl, sift together:
- 1 cup all-purpose flour
- Milk powder
- 1 tablespoon baking powder
- A small pinch of salt
Sifting helps remove lumps and distributes the baking powder evenly throughout the flour.
Add the sifted ingredients to the peanut-sugar paste and mix thoroughly.
Step 3: Add refined oil and prepare the dough
Add 3 tablespoons of refined oil and mix it into the flour mixture.
Rub and combine the ingredients with your hands until they begin to come together. If the mixture still feels too dry, add the remaining 1 tablespoon of oil.
The dough should come together into a smooth, soft mass that can be shaped by hand.
Important: The original recipe does not use additional water or liquid milk to prepare the dough. Add the oil gradually and avoid making the dough wet.
Step 4: Prepare the peanut and sesame coating
Lightly crush some roasted peanuts and place them on a plate.
Add 1 tablespoon of white sesame seeds and mix. This coating adds a nutty flavour and an attractive finish to the biscuits.
Step 5: Shape the biscuits
Take a small portion of the dough and roll it into a ball between your palms. Flatten it gently.
Press the biscuit into the crushed peanut and sesame mixture so that the coating sticks to both sides.
Shape it into a square, round, or any other shape you prefer. Keep the thickness reasonably even so that the biscuits bake uniformly.
Repeat with the remaining dough.
Step 6: Prepare the baking tray
Grease a small, heat-safe tray or plate with a little refined oil. If you have suitable baking parchment, line the tray with it and grease lightly.
Arrange the shaped biscuits on the tray, leaving a little space between each piece. This allows room for slight expansion during baking.
Use only cookware that is safe for stovetop baking.
Step 7: Preheat the kadai
Place a heavy-bottomed kadai on the stove and preheat it over medium heat for approximately five minutes.
Carefully place the biscuit tray inside the kadai. Cover with a lid and reduce the heat to low.
For more even baking and to help prevent the bottoms from becoming too dark, place a suitable heat-safe stand inside the kadai and position the biscuit tray on top of it.
Do not allow the tray to sit directly on the hot base.
Step 8: Bake the biscuits for approximately 15 minutes
Bake over a low flame for approximately 15 minutes, checking the biscuits as needed because kadai thickness, heat, and biscuit size can affect the cooking time.
The original recipe uses a lid with a small vent covered by a clove. However, it is safer to follow the cookware manufacturer’s instructions and keep any required steam or pressure vents unobstructed. Do not block a vent on a pressure cooker.
The biscuits should look set and lightly golden. Avoid high heat, as the bottoms may burn before the biscuits cook properly.
If necessary, allow a little extra time rather than relying only on the clock.
Step 9: Cool completely before removing
Switch off the heat and carefully remove the tray using appropriate heat protection.
The biscuits will be soft while hot, so do not lift or move them immediately. Allow them to cool completely on the tray until they firm up.
Once cooled, gently remove the biscuits and enjoy their nutty flavour and crisp texture with a cup of tea.
Tips for Perfect Bakery-Style Badam Biscuits
- Measure carefully: Use the same cup for the main ingredients to maintain the intended proportions.
- Use roasted peanuts: Roasting enhances their flavour and helps remove the skins easily.
- Don’t add water: The recipe uses oil to bring the dough together.
- Adjust the sugar: You can reduce the sugar slightly according to your taste.
- Shape evenly: Biscuits of similar thickness bake more consistently.
- Use a stand in the kadai: It helps prevent the bottoms from becoming too dark.
- Bake on low heat: A gentle flame helps the biscuits cook without burning.
- Cool before storing: Warm biscuits can release moisture inside a container and lose their crispness.
How to Store Homemade Badam Biscuits
Once the biscuits have cooled completely, store them in a clean, dry, airtight container. Keep the container away from moisture and direct sunlight.
The original video suggests storing the biscuits for three to four months. However, the recipe does not establish a tested shelf life, so it is better not to assume that they will remain safe and crisp for that long. For homemade biscuits, use a conservative storage period, inspect them before eating, and discard them if you notice any mould, unusual smell, or change in texture.
Frequently Asked Questions
Can I make Badam Biscuits without an oven?
Yes. This recipe uses a covered kadai on the stovetop. Use a heavy-bottomed kadai, a suitable heat-safe stand, and low heat for more even baking.
Can I use whole-wheat flour instead of maida?
The original recipe uses all-purpose flour. Whole-wheat flour may produce a different texture, so the amount of oil and the final crispness may need adjustment.
Can I make these biscuits without butter or ghee?
Yes. The recipe uses refined oil instead of butter or ghee.
Why are my biscuits soft after baking?
Biscuits can remain soft while hot. Let them cool completely before judging their final texture. If they are still soft after cooling, they may need additional baking time.
Why did the bottoms of my biscuits become too dark?
The tray may have been too close to the hot base of the kadai, or the flame may have been too high. Use a heat-safe stand and bake over a low flame.
Final Thoughts
These homemade Bakery-Style Badam Biscuits are a delicious tea-time snack made with roasted peanuts, sugar, flour, and a crunchy peanut-sesame coating. With no oven, butter, or ghee required, this recipe is a convenient way to prepare fresh biscuits at home.
Try this easy recipe and enjoy homemade nutty biscuits with your favourite cup of tea.
For more Bengali recipes, homemade snacks, and easy cooking ideas, follow BengaliPaakshala.